[node.js] 암호화 그리고 encrypt password

Buffer와 Stream
누가 그랬다. 동영상 볼 때 버퍼링이랑 스트리밍을 생각하면 된다고 Buffer : 일정한 크기로 모아두는 데이터 Stream : 일정한 크기(버퍼 크기)의 데이터를 지속적으로 전달하는 데이터 흐름
buffer는 raw 바이너리 데이터(0과 1)를 저장할 수 있는 특수한 유형의 객체다. 버퍼는 일반적으로 컴포터에 할당된 메모리 청크, 일반적으로 RAM을 나타낸다. 일단 버퍼크기를 설정하게 되면, 이후에는 변경할 수 없다. 버퍼는 바이트를 저장하는 단위라고 볼 수 있다. 그리고 바이트는 8비트 순서이다. 비트는 컴퓨터의 가장 기본적인 저장 단위이며, 0 또는 1로 이루어져 있다.
버퍼를 쉽게 만드는 방법(utf8)
- Buffer.from() : 인자를 담아서 만든다.
- Buffer.alloc() : 빈 버퍼를 생성한다. (Buffer.concat([buf1, buf2, …]); // 버퍼 합치기(join))
암호화 : cryptography
보안 뿐만 아니라 암호화는 중요하다. 우리가 가볍게 생각하는 password도 물론 암호화로 되어있다. 개인정보가 중요한 시대에 암호화는 반드시 함께 가야할 기술이다.
encrypt(cipher) : 암호화 하기
- 단방향 : password 복호화되면 안되는 것
- 양방향 : 주민번호
- 대칭 : 1 => 1
- 비대칭 : 1 => 2 공인인증서는 비대칭 키
decrypt(decipher) : 암호 해독하기
단방향 암호화 : crypto
node에서 제공하는 암호화 모듈이다.
- crypto.randomBytes(keyLen) => Buffer
무작위 string을 얻는 방법
salt를 해싱 번형을 위하여 사용한다.
왜 해싱을 변형해야할까? 그냥 돌리면
rainbow table에서 그냥 확인이 가능하기 때문이다.레인보우 테이블(rainbow table)은 해시함수(MD-5, SHA-1, SHA-2 등)를 사용하여 만들어낼 수 있는 값들을 대량으로 저장한 표이다. 보통 해시함수를 이용하여 저장된 비밀번호로부터 원래의 비밀번호를 추출해 내는데 사용된다.
const salt = crypto.randomBytes(20).toString('base64');

// tU43CEhOmngPVD/VQKvIN866nYw=- crypto.pbkdf2(data, salt, hashCnt, keyLen, digest, (err, derivedKey) => {})
- crypto.pbkdf2Sync(data, salt, hashCnt, keyLen, digest)
pbkdf2Sync를 사용하면 보안이 강화되긴 하지만 더 느리다.
그래서 pbkdf2를 현업에서 주로 사용한다고 한다. 그 말이 맞는지 확인해보자
Try This - encrypt password
- 다음과 같이 pbkdf2함수로 Password를 암호화하는 비동기(Promise) 함수를 작성하시오. (단, 16384회 key-stretching, 길이 128, 알고리즘 sha512 해싱)
const salt = crypto.randomBytes(64).toString('base64');
const encryptedPassword = await encryptPassword(data, salt);
console.log('암호화된 Password>>', encryptedPassword);
import crypto from "crypto";

const data = "가나다라마바이호준";
const encryptPassword = (data, salt, stretching = 16384) =>
    new Promise((resolve, reject) => {
        crypto.pbkdf2(
            data,
            salt,
            stretching,
            128,
            "sha512",
            (err, derivedKey) => {
                if (err) reject(err);
                console.log("dk1>>", derivedKey.toString("base64"));
                resolve(derivedKey.toString("base64"));
            }
        );
    });

const salt = crypto.randomBytes(64).toString("base64");
const encryptedPassword = await encryptPassword(data, salt);
console.log("암호화된 Password>>", encryptedPassword);

암호화는 비동기로 처리되기 때문에 반드시 비동기를 숙지하고 있어야한다. 내가 넣은 data가 형체도 알아볼 수 없이 바뀌었다. 엄청난 암호화의 위력이다. 단방향 암호화 모듈이기 때문에 복호화가 불가능하다.
그렇다면
pbkdf2와 scryptSync 함수의 속도를 비교해보자
pbkdf2와 scryptSync 차이
console.time('PBKDF2');
console.log(await encryptPassword(data));  // 16384
console.timeEnd('PBKDF2');

console.time('SCRYPT');
console.log(crypto.scryptSync(data, salt, 128, { N: 16384 }));
console.timeEnd('SCRYPT');
2배에 가까운 속도차이가 나는 것을 볼 수 있다. 그래서 왠만하면 pbkdf2를 쓰자.
PBKDF2는 아주 가볍고 구현하기 쉬우며, SHA와 같이 검증된 해시 함수만을 사용한다. scrypt는 오프라인 brute force 공격에 대해 더 강력하지만, 많은 메모리와 CPU를 사용한다. 그래서 방어자도 공격자도 비싸서 모두 힘들다.

양방향 암호화 : createCipheriv
//암호화
crypto.createCipheriv(algorithm, key, iv[, options])

//복호화
crypto.createDecipheriv(algorithm, key, iv[, options])
Try This - MyCipher (대칭키 암호화)
다음과 같이 편리한 양방향 암호화 모듈을 작성하시오. (단, key는 고정, iv는 가변이며, 암호화 후 재시작후에도 복호화 가능하도록!)
// mycipher.js
const KEY = Buffer.from('seniorcoding!@#$'.repeat(2)); // 256 / 8 = 32 length만 지키고 자유롭게 사용하세요.
const ALGORITHM = 'aes-256-cbc';  // 원하는 알고리즘을 입력하세요.
const DIGEST = 'base64';    // hex로 해도 무관합니다.

// other-file.js
import { MyCipher } from './utils/mycipher.js';
const myCipher = new MyCipher();
const data = '@시코-시니어코딩';
const encryptedData = myCipher.encrypt(data);
console.log('ENC>>', encryptedData);
const descryptedData = myCipher.decrypt(encryptedData);
console.log('결과>>', descryptedData, descryptedData === data);

// 커맨드라인 실행 (-enc 또는 -e: 암호화, -dec 또는 -d: 복호화)
$> node mycipher -enc 암호화할데이터
$> node mycipher -dec 복호화할데이터
class로 작성해보았다. 키, 알고리즘, digest를 고정값으로 선언되었다.
//myCipher.js
import crypto from "crypto";

const KEY = Buffer.from("seniorcoding!@#$".repeat(2)); // 256 / 8 = 32 length만 지키고 자유롭게 사용하세요.
const ALGORITHM = "aes-256-cbc"; // 원하는 알고리즘을 입력하세요.
const DIGEST = "base64"; // hex로 해도 무관합니다.

export class MyCipher {
    constructor() {
        this.iv = crypto.randomBytes(16);
    }
    encrypt(data) {
        const cipher = crypto.createCipheriv(ALGORITHM, KEY, this.iv);
        const encUpdateBuffer = cipher.update(data);
        const encryptedData = Buffer.concat([
            encUpdateBuffer,
            cipher.final(),
        ]).toString(DIGEST);

        return `${this.iv.toString("hex")}:${encryptedData}`;
    }

    decrypt(IVencryptedData) {
        const [iv, encryptedData] = IVencryptedData.split(":");
        const decipher = crypto.createDecipheriv(
            ALGORITHM,
            KEY,
            Buffer.from(iv, "hex")
        );

        const decUpdateBuffer = decipher.update(encryptedData, DIGEST);
        return Buffer.concat([decUpdateBuffer, decipher.final()]).toString();
    }
}

// other-file.js

import { MyCipher } from "./vv_mycipher.js";

const myCipher = new MyCipher();
const data = "@시코-시니어코딩";
const encryptedData = myCipher.encrypt(data);
console.log("ENC>>", encryptedData);

const descryptedData = myCipher.decrypt(encryptedData);
console.log("결과>>", descryptedData, descryptedData === data);
가변적인 IV를 구현하기 위해 constructor에 IV값을 심어두었다.
encrypt 메서드를 만들어서 결과 값에 IV를 넘겨줌으로서 재시작후에도 복호화가 가능하도록 대칭키 복호화를 구현하였다.
iv는 가변적으로 변하기때문에 결과에 함께 담아주는 것이다!
decrypt 메서드에서는 IVencryptedData를 매개변수로 받는다. 이는 IV 값과 encryptedData 값을 구분해주어야한다.
따라서 : 를 구분자로 const [iv, encryptedData] = IVencryptedData.split(":"); 비구조 할당하여 사용한다.
iv값는 tostring 되어 넘어왔으므로 Buffer.from(iv, 'hex') 하여 줌으로서 hex 로 digest 해준다.
다이제스트(digest)는 정보 통신에서 임의 길이의 데이터 블록을 고정 길이로 변환하는 해시 알고리즘(hash algorism)에서의 해시값을 가리킨다.
커멘드 라인으로 cipher 실행하기
// 커맨드라인 실행 (-enc 또는 -e: 암호화, -dec 또는 -d: 복호화)
$> node mycipher -enc 암호화할데이터
$> node mycipher -dec 복호화할데이터
const argvLen = process.argv?.length;
if (argvLen > 2 && argvLen !== 4) {
console.log("usage > node mycipher [-e|-enc] data");
console.log("usage > node mycipher [-d|-dec] data");
process.exit(1);
// const data = process.argv[3];
// console.log("myCipher.encrypt(data) :>> ", myCipher.encrypt(data));
}
if (argvLen === 4) {
const flag = process.argv[2];
const data = process.argv[3];
const mycipher = new MyCipher();
if (flag?.startsWith("-e")) {
console.log(mycipher.encrypt(data));
} else if (flag?.startsWith("-d")) {
console.log(mycipher.decrypt(data));
}
}
process.argv 노드시작할 때 실행인자 받기
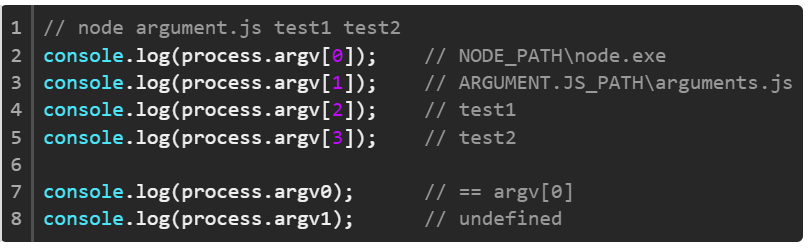
process 객체의 argv로 접근하면 시작할 때 뒤에 오는 인자 값들을 순서대로 사용할 수 있다.
반드시 4개의 커멘드가 있어야한다.
if (process.argv?.length === 4) 아래 조건들을 실행하면 커멘드라인으로도 암호화/복호화 결과값을 얻을 수 있다.
결론
양방향 암호화에선 알고리즘 / key / iv를 잘 보관하는게 제일 중요하다. 무의식적으로 사용하던 비밀번호나 어떤 특정 정보값들이 암호화기술로 관리된다는게 놀라웠다. 그만큼 위험하고 잘 사용해야하는 기술이다. 화면을 구성하는게 재밌던 나는 흑백화면에서 작업하는게 쉽지만은 않다. 하지만 멋진 개발자가 되기위해선 반드시 알아야하는 기술들이 있다. 암호화의 기본기를 잘 익혀두자.
출처
SSAC 영등포 교육기관에서 풀스택 실무 프로젝트 과정을 수강하고 있다. JS전반을 깊이 있게 배우고 실무에 사용되는 프로젝트를 다룬다. 앞으로 그 과정 중의 내용을 블로그에 다루고자 한다. 전성호 님과 함께!