[node.js] nodejs 기본기 & URL.toString() 직접 확장하기

node.js 수업을 시작했다. JS기반이지만, 처음 써보는 기술이기도 하고 아직 생소하다. node.js는 javascript의 혁명으로 불리운다. JS로 서버 개발하는 목적으로 만든 JS Runtime으로 웹서버로 활용되며, 프로그래밍적으로 사용자에게 전송할 데이터를 생성한다.
nodejs는 아래와 같은 특징을 가지고 있다.
- 결국, 인터넷 기술의 혁명
babel, webpack, npm, express, react, vue, angular, ember, etc.
- 가볍고 효율적인 비동기 I/O Non-blocking I/O
- 이벤트 기반 event-driven
(everything is event and middleware. - Express)
module
소스 코드를 작으면서 유지보수 하기 편하고 재사용성과 개발 효율성을 극대화하는 조각으로 나누자!
node.js는 cjs(commonJS)가 기본이긴 하지만
require를 사용하는 cjs는 과거 표준이다. 실제로 nodejs doc에서도 import로 시작하는 ESM (ECMAScript Modules)를 사용을 권장한다.
ESM를 써야하는 이유
- CJS is module object 를 사용 하면 require시에 destructuring이 된다. // 즉, module의 변수 값을 변경될 수 있어 보안에 취약하다.
- client(react, vue, etc) 소스는 ESM를 사용한다(표준)
- bundling 시 tree-shaking을 위해서라도 ESM
트리 쉐이킹 (Tree Shaking) 사용하지 않는 코드를 제거하는 방식을 말한다. (Rollup, Webpack에서도 찾아볼 수 있다) 나무를 흔들면 죽은 잎사귀들이 떨어지는 모습에 착안해 Tree-shaking 이라고 명명하였다고 한다.
- old node version(14이전)이면 CJS 사용해야한다.
In all, EMCAScript modules are the future of JavaScript!!
NodeJS에서 ESM 사용 방법
- package.json에 "type": "module", 추가!
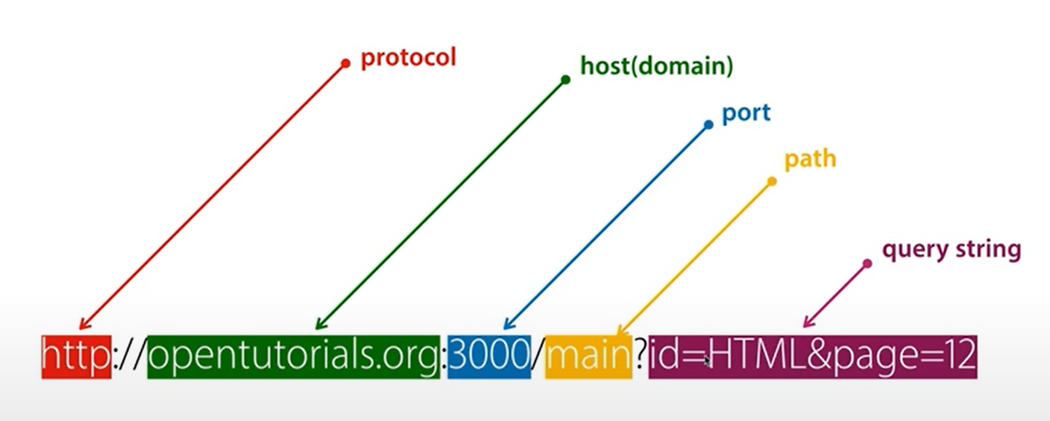
URL -WHATWG 이 표준
the node url: A URL string is a structured string containing multiple meaningful components. When parsed, a URL object is returned containing properties for each of these components. WHATWG URL Standard used by web browsers.
WHATWG (Web Hypertext Application Technology Working Group)
- import 불필요! (URL 클래스는 global object)
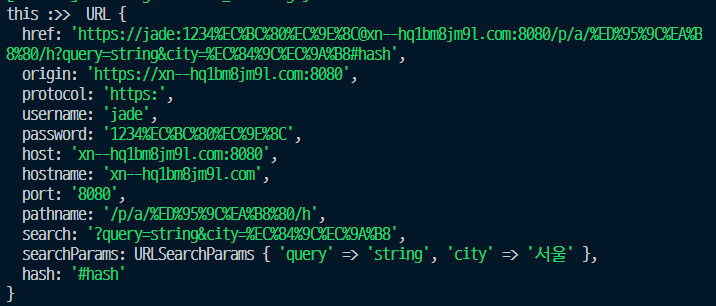
 const surl = new URL(sampleUrl);  // same as new url.URL(sampleUrl)
 console.log(surl, surl instanceof URL);  // URL type
 console.log(surl.href, surl.origin, surl.pathname, surl.search, surl.hash);
 console.log(surl.toString()); // https://user:pass@sub.example.com:8080/p/a/t/h?query=string#hash
URL은 URL에 포함된 쿼리 스트링을 해석해서 이용하는 방법이다. 자바스크립트를 이용해서 nodejs가 가지고 있는 기능을 호출하면 우리가 웹 app을 nodejs로 만들 수 있게 된다는 말이다.
URL.toString() 직접 구현하기
URL.tostring() :: URL 개체의 toString() 메서드는 직렬화된 URL을 반환합니다. 그 반환된 값은 url.href 및 url.toJSON()의 값과 동일합니다. (파파고 도움)
다음과 같이 toString 함수의 기능을 기존 format함수와 같이 확장해 보자.
(URL.prototype.toString 또는 class MyURL extends URL)
//실행코드
const sampleUrl1 =
"https://jade:1234케잌@sub.도메인.com:8080/p/a/한글/h?query=string&city=서울#hash";
// const myurl = new URL(sampleUrl) 또는 new MyURL(sampleUrl)
const myurl1 = new URL(sampleUrl1);
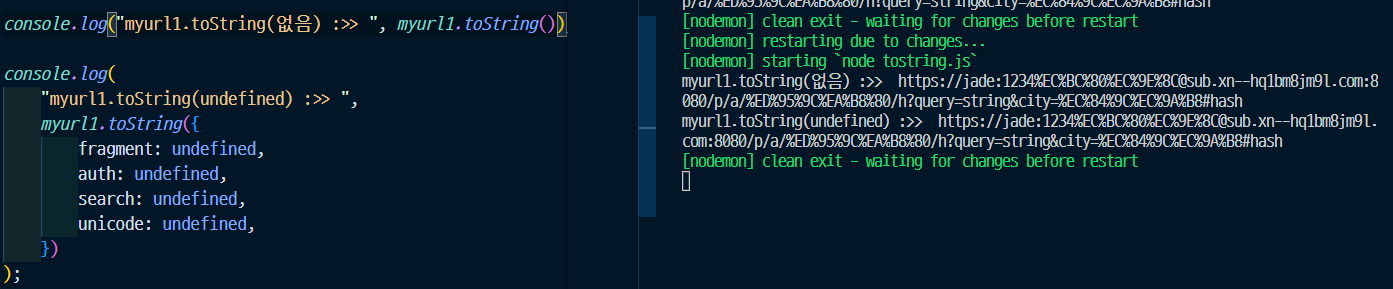
console.log(
myurl1.toString({
fragment: true, auth: true, search: true, unicode: false,
})
); // all default
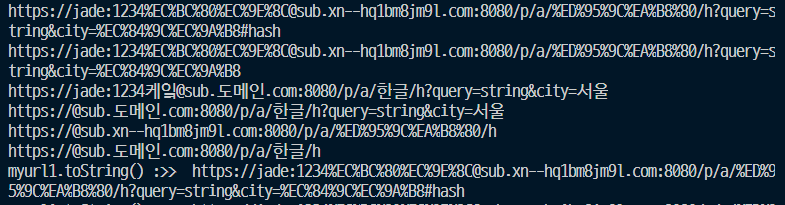
// ⇒ https://jade:1234%EC%BC%80%EC%9E%8C@sub.xn--5u5b99k.com:8080/p/a/%ED%95%9C%EA%B8%80/h?query=string&city=%EC%84%9C%EC%9A%B8#hash
console.log(
myurl1.toString({
fragment: false, auth: true, search: true, unicode: false,
})
);
// ⇒ https://jade:1234%EC%BC%80%EC%9E%8C@sub.xn--5u5b99k.com:8080/p/a/%ED%95%9C%EA%B8%80/h?query=string&city=%EC%84%9C%EC%9A%B8
console.log(
myurl1.toString({
fragment: false, auth: true, search: true, unicode: true,
})
);
// ⇒ https://jade:1234케잌@sub.케잌.com:8080/p/a/한글/h?query=string&city=서울
console.log(
myurl1.toString({
fragment: false, auth: false, search: true, unicode: true,
})
);
// ⇒ https://sub.케잌.com:8080/p/a/한글/h?query=string&city=서울
console.log(myurl1.toString({ fragment: false, auth: false, search: false }));
// ⇒ https://sub.xn--5u5b99k.com:8080/p/a/%ED%95%9C%EA%B8%80/h
console.log(
myurl1.toString({
fragment: false, auth: false, search: false, unicode: true,
})
);
// ⇒ https://sub.케잌.com:8080/p/a/한글/h삼항연산자로 URL.toString() 확장
나는 클래스로 구현하는 것보다 prototype.fn형태로 구현하는게 조금 더 편했다.
함수 내부에 this를 console.log 찍어 어떻게 생겼는지 확인해보자.
해당 trythis를 하며 매개변수 디스트럭쳐링(비구조할당)에 대해 더 공부했다.
URL.prototype.toString = function ({
    fragment,
    auth = true,
    search = true,
    unicode = true,
} = {}) {
4개의 매개변수를 받는다. 해당 값들은 boolean값으로 구성되어있으며, 값이 없을 땐 default 값을 넣어준다. 여기서 눈여겨 봐야할 점은 매개 변수가 들어오지 않았을 때, 어떻게 처리해줄 것인가 이다. 배열의 default 값은 어떻게 넣어줘야할까? ={} 빈객체를 할당해주었다.
빈 객체를 기본 값으로 준다는 건 undefined 즉, falsey한 값을 주겠다는 의미이다. 왜 false를 넣으면 안되는지는 조금 더 있다가 알아보자.
import { toUnicode } from "punycode";

URL.prototype.toString = function ({
    fragment = true,
    auth = true,
    search = true,
    unicode,
} = {}) {
    // console.log("this :>> ", this);
    // if (fragment && auth && search) {
    //     return this.href;
    // } else if (auth && search && !fragment) {
    //     return `${this.protocol}${(this.username, this.password)}${this.host}${
    //         this.pathname
    //     }${this.host}`;
    // } else if (search && !auth && !fragment) {
    //     return `${this.origin}${this.pathname}${this.search}`;
    // } else {
    //     return `${this.origin}${this.pathname}`;
    // }

    const resURL = `${this.protocol}//${
        auth ? this.username + ":" + this.password : ""
    }@${unicode ? toUnicode(this.host) : this.host}${this.pathname}${
        search ? this.search : ""
    }${fragment ? this.hash : ""} `;

    return `${unicode ? decodeURI(resURL) : resURL}`;
};
처음엔 그냥 무식하게 조건문으로 때려박았다. 하지만 불편했다. 그래서 삼항연산자로 매개변수 값을 비교해 때려 넣었다. 이것도 재사용성과 코드 수정에서 좋은 방법은 아니었다. 왜냐하면 하던 중 unicode 매개변수 값을 활용하라는 문제가 추가되었는데, 장황한 코드는 어디서부터 수정해야할지 막막했다. 가독성이 이래서 중요하다.
array에 때려넣어 URL.toString() 구현 (성호님코드)
const sampleUrl =
    "https://jade:1234케잌@도메인.com:8080/p/a/한글/h?query=string&city=서울#hash";
import { toUnicode } from "punycode"; // cf. decodeURIComponent()

const xxFn = function ({
    fragment = true,
    auth = true,
    search = true,
    unicode,
} = {}) {
    const rets = [];

    rets.push(this.protocol);
    rets.push("//");
    if (auth) {
        rets.push(this.username);
        rets.push(":");
        rets.push(this.password);
        rets.push("@");
    }
    rets.push(unicode ? toUnicode(this.host) : this.host);
    rets.push(this.pathname);
    if (search) rets.push(this.search);
    if (fragment) rets.push(this.hash);
    if (unicode) return decodeURI(rets.join(""));
    return rets.join("");
};

URL.prototype.toString = xxFn;

class MyURL extends URL {
    toString = xxFn;
}
const rets = [];
빈 array를 생성하고 조건(매개변수) 값에 따라 array.push 하는 방법을 사용했다. 더 직관적일 뿐더러 중간중간 새로운 요구사항이 생겨도 비교적 수정하기 편했다.
또한 재미있는 사실은 함수 표현식(Function Expressions, 변수에 함수를 할당하는 방식)을 활용해 함수를 할당해 놓고
URL.prototype.toString = xxFn;

class MyURL extends URL {
    toString = xxFn;
}
prototype과 class의 메서드로 할당해 사용할 수 있는것도 신기했다.
결론
의식적으로 node.js 웹 서버를 만들어본 적이 아직 없다. 그래서 확실히 이해가 되진 않는다. 하지만 URL을 활용해 웹서버의 router를 바꾼다는 점은 재미있다. 쿼리스트링의 개념도 알게되어 좋았다.
출처
SSAC 영등포 교육기관에서 풀스택 실무 프로젝트 과정을 수강하고 있다. JS전반을 깊이 있게 배우고 실무에 사용되는 프로젝트를 다룬다. 앞으로 그 과정 중의 내용을 블로그에 다루고자 한다. 전성호 님과 함께!