[node.js] 메일 발송서비스 만들기 : nodemailer test 코드 작성

코드를 짜서 메일을 보낸다니? nodemailer를 이용해보자
파일구성
utils -mailer.js - 메일을 보내는 send함수 구현
test - mailer.test.js - 메일이 잘보내지는지 테스트 코드 구현
config.js MainInfo를 관리하는 정보
nodemailer 활용
install nodemailer Send emails from Node.js – easy as cake! 🍰✉️ 케이크처럼 쉽게 노드.js에서 메일들을 보낸다.
$> yarn add nodemailer
  import {createTransport} from 'nodemailer';
google 계정 활용 (앱 비밀번호)
google app password settings
- https://myaccount.google.com/security 보안 탭 - 앱 비밀번호 탭
- app account setting
구글 앱 비밀번호 활용하기

앱 선택 - 기타(노드를 쓸거니까) 기기 선택 - 기타 (mail-server) 이런식으로 써도됨

그럼 앱 비밀번호가 나온다. 그 번호를 일단 잘 복사해둔다. 원래 nodemailer는 그냥 구글 id와 비밀번호를 그대로 받았는데 보안상의 문제로 이렇게 바뀐지 얼마 되지 않았다고 한다. 지금도 비밀번호를 그대로 넣을 수 있지만 기능이 제한된다고 한다.
코드 작성
send 메일 함수 구현
처음부터 너무 추상화하여 코드를 작성하지말자. 만약 메일이 안보내질 때 처리는 어떻게 할 것인가? 일단 메일이 간 뒤 리팩토링해도 늦지 않다.
action 부터 확인하자!
// mailer.js

import { createTransport } from 'nodemailer';
import { MainInfo } from '../config';

export const send = async ({
  from,
  to,
  subject,
  text,
  html,
  attachments,
  auth,
}) => {
  const trans = createTransport(auth ? { ...MainInfo, auth } : MainInfo);
  try {
    const result = await trans.sendMail({
      from,
      to,
      subject,
      text,
      html,
      attachments,
      auth,
    });
    // console.log('result :>> ', result);
  } catch (error) {
    // console.log('error :>> ', error);
  }
};
매개변수 소개
from, 발신자 to, 수신자 subject, 제목 text, 내용 html, html로 보낼거면 이거! attachments, 첨부파일을 보낼 거면 추가 auth, 인증을 추가할거면 이것도
createTransport
메일을 발송하는 작업은 createTransport 내에서 이뤄진다.
MainInfo를 담아서 보낼 것이다. 이는 자주 수정하는 부분이 아니고 config 될 자료이기때문에 따로 파일을 작성했다.
config.js
//config.js

import { config } from 'dotenv';
config();

export const { PORT, GOOGLE_APP_PASS, GOOGLE_APP_USER } = process.env;

export const MainInfo = {
  sender: '"bnm" <ho2yahh.corp@gmail.com>',
  service: 'gmail',
  host: 'smtp.gmail.com',
  port: '587',
  secure: false,
  tls: { rejectUnauthorize: false },
  maxConnections: 5,
  maxMessages: 10,
  auth: { user: GOOGLE_APP_USER, pass: GOOGLE_APP_PASS },
};
더 중요한 자료는 process.env에 담아서 사용했다. git에도 안올라가고 local에서 정보를 관리 할 수 있다.
이렇게 담은 정보 MainInfo를 export 해서 다시 mailer.js로 돌아온다.
const trans = createTransport(auth ? { ...MainInfo, auth } : MainInfo);
  try {
    const result = await trans.sendMail({
      from,
      to,
      subject,
      text,
      html,
      attachments,
      auth,
    });
    // console.log('result :>> ', result);
  } catch (error) {
    // console.log('error :>> ', error);
  }
매개변수로 새로운 auth를 담아서 보내면, MainInfo에 auth를 덮어서 createTrasport를 해주고, 아니면 그냥 MainInfo를 인자로 전달한다.
메일 발송작업은 비동기로 이루어지기 때문에 error처리를 위해 try/catch문을 사용했다.
send 함수에 async를 달아주고 비동기함수 인 trans.sendMail에 await를 걸어준다. 인자로는 매개변수로 받은 값들을 넣어주면 메일이 발송되는 함수이다.
테스트 코드 작성 (TDD)
백엔드 코드에도 jest 를 사용했다.
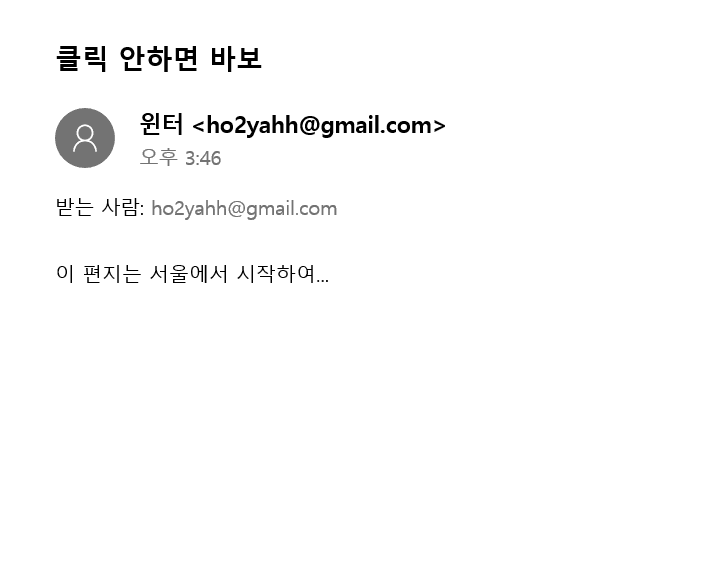
// mailer.test.js

import { send } from '../utils/mailer';

/**
 * send mail: emailTitle, emailBody(userName, button with token and userId)
 * confirm token: check token by user
 */

describe('mailsender', () => {
  test('send mail', () => {
    send({
      from: '"윈터" <pocaz.corp@gmail.com>',
      to: 'ho2yahh@gmail.com',
      subject: '클릭 안하면 바보',
      text: '이 편지는 서울에서 시작하여... ',
    });
  });
  test('confirm token', () => {});
});
메일 발송 서비스를 테스트하는 코드이다. send 함수를 import 해온다.
yarn test mailer.test.js cli 한다.

아주 잘 온다. 뿌듯✨
html을 보내기
//config.js

export const signUpEmail = (
  userName,
  token,
  host = 'https://common.topician.com/'
) => `<!DOCTYPE html>
<html lang="en">
<head>
  <meta charset="UTF-8">
  <meta http-equiv="X-UA-Compatible" content="IE=edge">
  <meta name="viewport" content="width=device-width, initial-scale=1.0">
  <title>B & M</title>
</head>
<body>
  <h3>${userName}님 반가워요!</h3>
  <div>
    가입을 완료하시려면 아래 가입 승인 버튼을 눌러주세요👍🏽
  </div>
  <p><a href="${host}/auth?token=${token}">승인하기</a></p>
</body>
</html>`;
config.js 에 signUpEmail 함수를 추가한다. html을 return 한다.
//mailer.test.js
...
send({
      from: '"bnm" <indiflex.corp@gmail.com>',
      to: 'indiflex1@gmail.com, ho2yahh@gmail.com, 213069@naver.com',
      subject: '타이틀',
      text: '본문내용',
      html: signUpEmail(
        '하덕일', //userName
        'dfafsdadf23124r3oldefdjsal', //token
        'http://localhost:4001' // host
      ),
  ...
html 키값에 signUpEmail함수를 불러와 인자를 채워서 보낸다.
첨부 기능 추가하기
      html: signUpEmail(
        ...
      ),
      attachments: [
        {
          filename: '궁금하면 열어보시오',
          path: new URL('send.html', import.meta.url).pathname,
        },
      ],
첨부 파일을 올리려면 위와 같은 형식으로 추가해줘야 한다. path는 반드시 지정해주어야 하며, _dirname을 안쓰고 import.meta.url로 파일 주소값을 가져온다.
실행시켜보자.

첨부까지 담긴 메일이 오는 것을 볼 수 있다.
개선필요
클래스로 바꾸기
왜 클래스로 바꿔야하는가? 익스프레스가 구동될 때 mailer를 올려놓고, transport 계속 안하기 위해서! transport 자주하는게 부담으로 다가와
결론
채팅 기능을 개발하면서 카톡에 감사함을 느꼈듯이, 구글 메일에게도 매우 감사함을 느끼며 살아가자 ^_^👍🏽
출처
SSAC 영등포 교육기관에서 풀스택 실무 프로젝트 과정을 수강하고 있다. JS전반을 깊이 있게 배우고 실무에 사용되는 프로젝트를 다룬다. 앞으로 그 과정 중의 내용을 블로그에 다루고자 한다. 전성호 님과 함께!
- 시니어코딩 : youtube

