
socket으로 webauthn 로그인 연결 도전 | socketIO를 이용한 실시간 두더지 게임 구현하기 (4)
목표
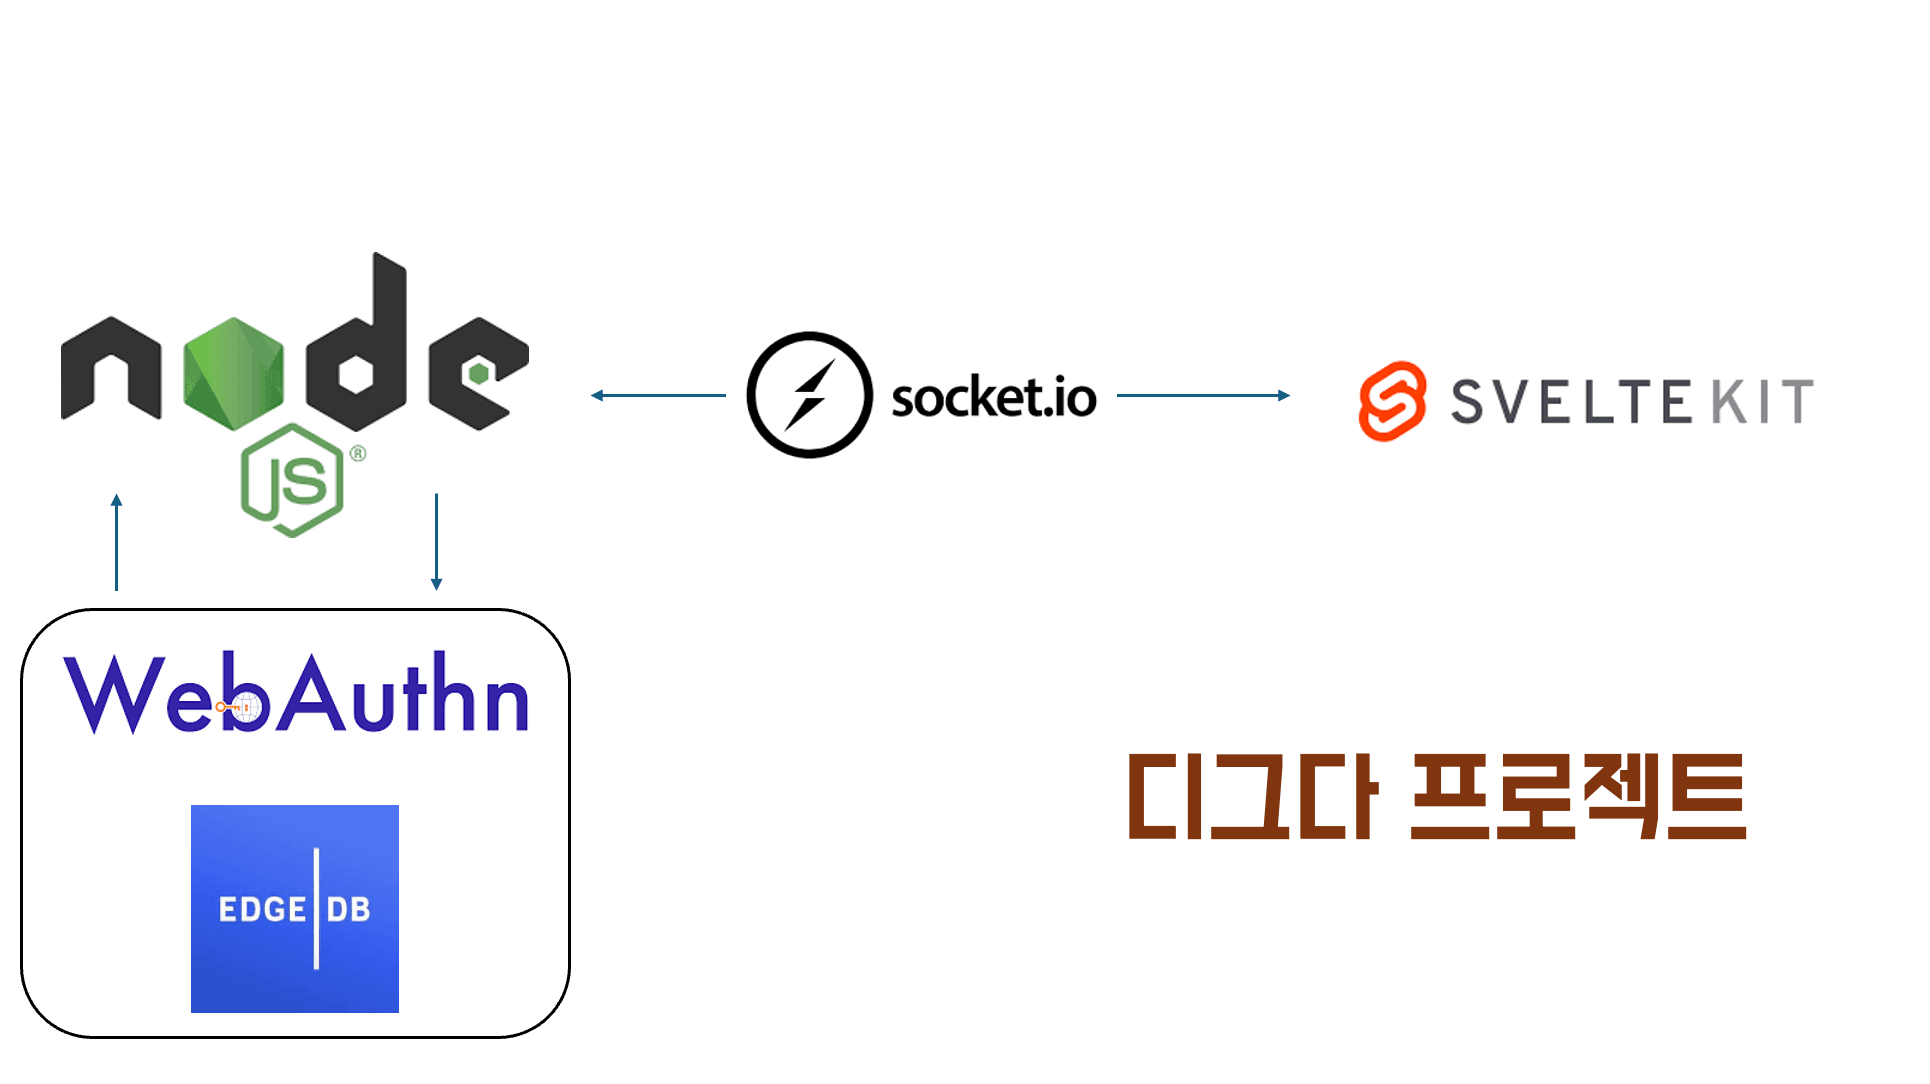
기존에 restAPI로 구현된 예제를 참고하여 edgeDB를 활용한 webauthn으로 로그인을 구현한다. 단 client와 server의 통신은 socket(ws)으로 진행한다. 사실상 필요없는 단방향 통신이지만, 경험삼아 실시간으로 해본다.
이유
인증과 권한의 프로세스를 이해한다. 제공해주는 모듈을 쓰면 당연히 쉽다. 하지만 내부 원리를 이해하기 어렵다. 그래서 ws로 직접 코드를 열어보고 직접 내 입맛대로 작성해보는 경험은 중요하다. 당장 쓸모는 없지만 가치있는 ws로 webauthn 연결하기를 하는 이유이다.
참고 : auth의 새로운 표준, webauthn 을 사용해야하는 이유
edgeDB의 auth 가이드

정독하자. EdgeDb - DOCS - Auth - Overview
그냥 뭣도모르고 따라했다가 많이 돌아왔다. 정독하자 공식문서! 얍!
Enable extension in your schema you will need to add the extension to your app's schema:
1. 너의 스키마에 auth 익스텐션 추가
using extension auth;
하고 마이그레이션하고 클라우드로 푸쉬하자. 모르겠으면 전에 작성된 글을 참고하자.
edgeDB cloud setting
edgeDB에 들어가보면 Auth admin extension이 열려 있다.
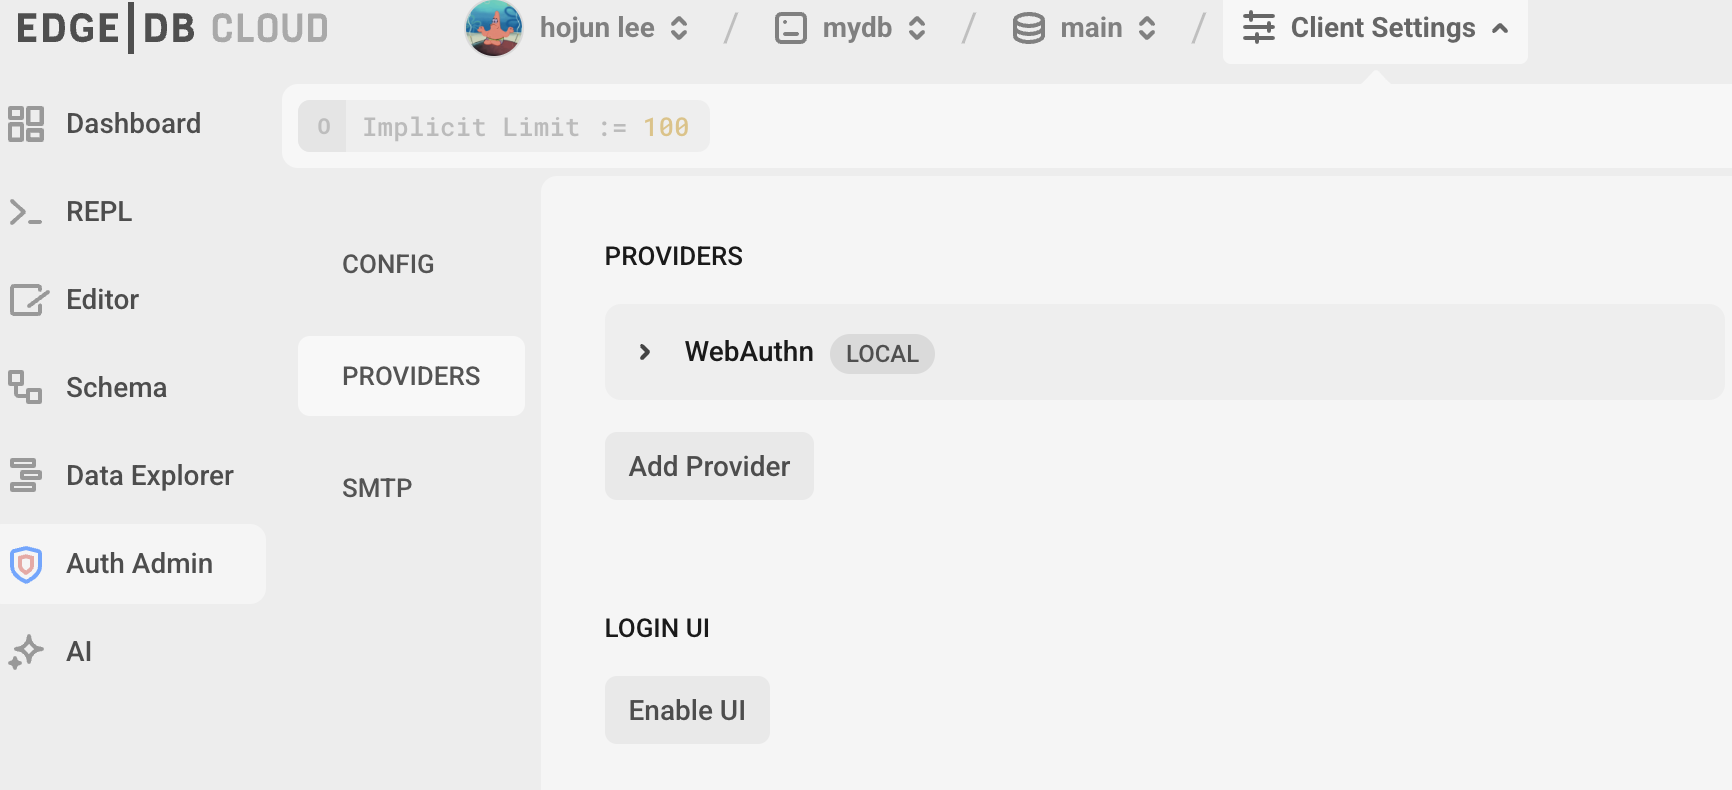
처음엔 providers가 없을 것이다. 반 드 시 추가해야한다.
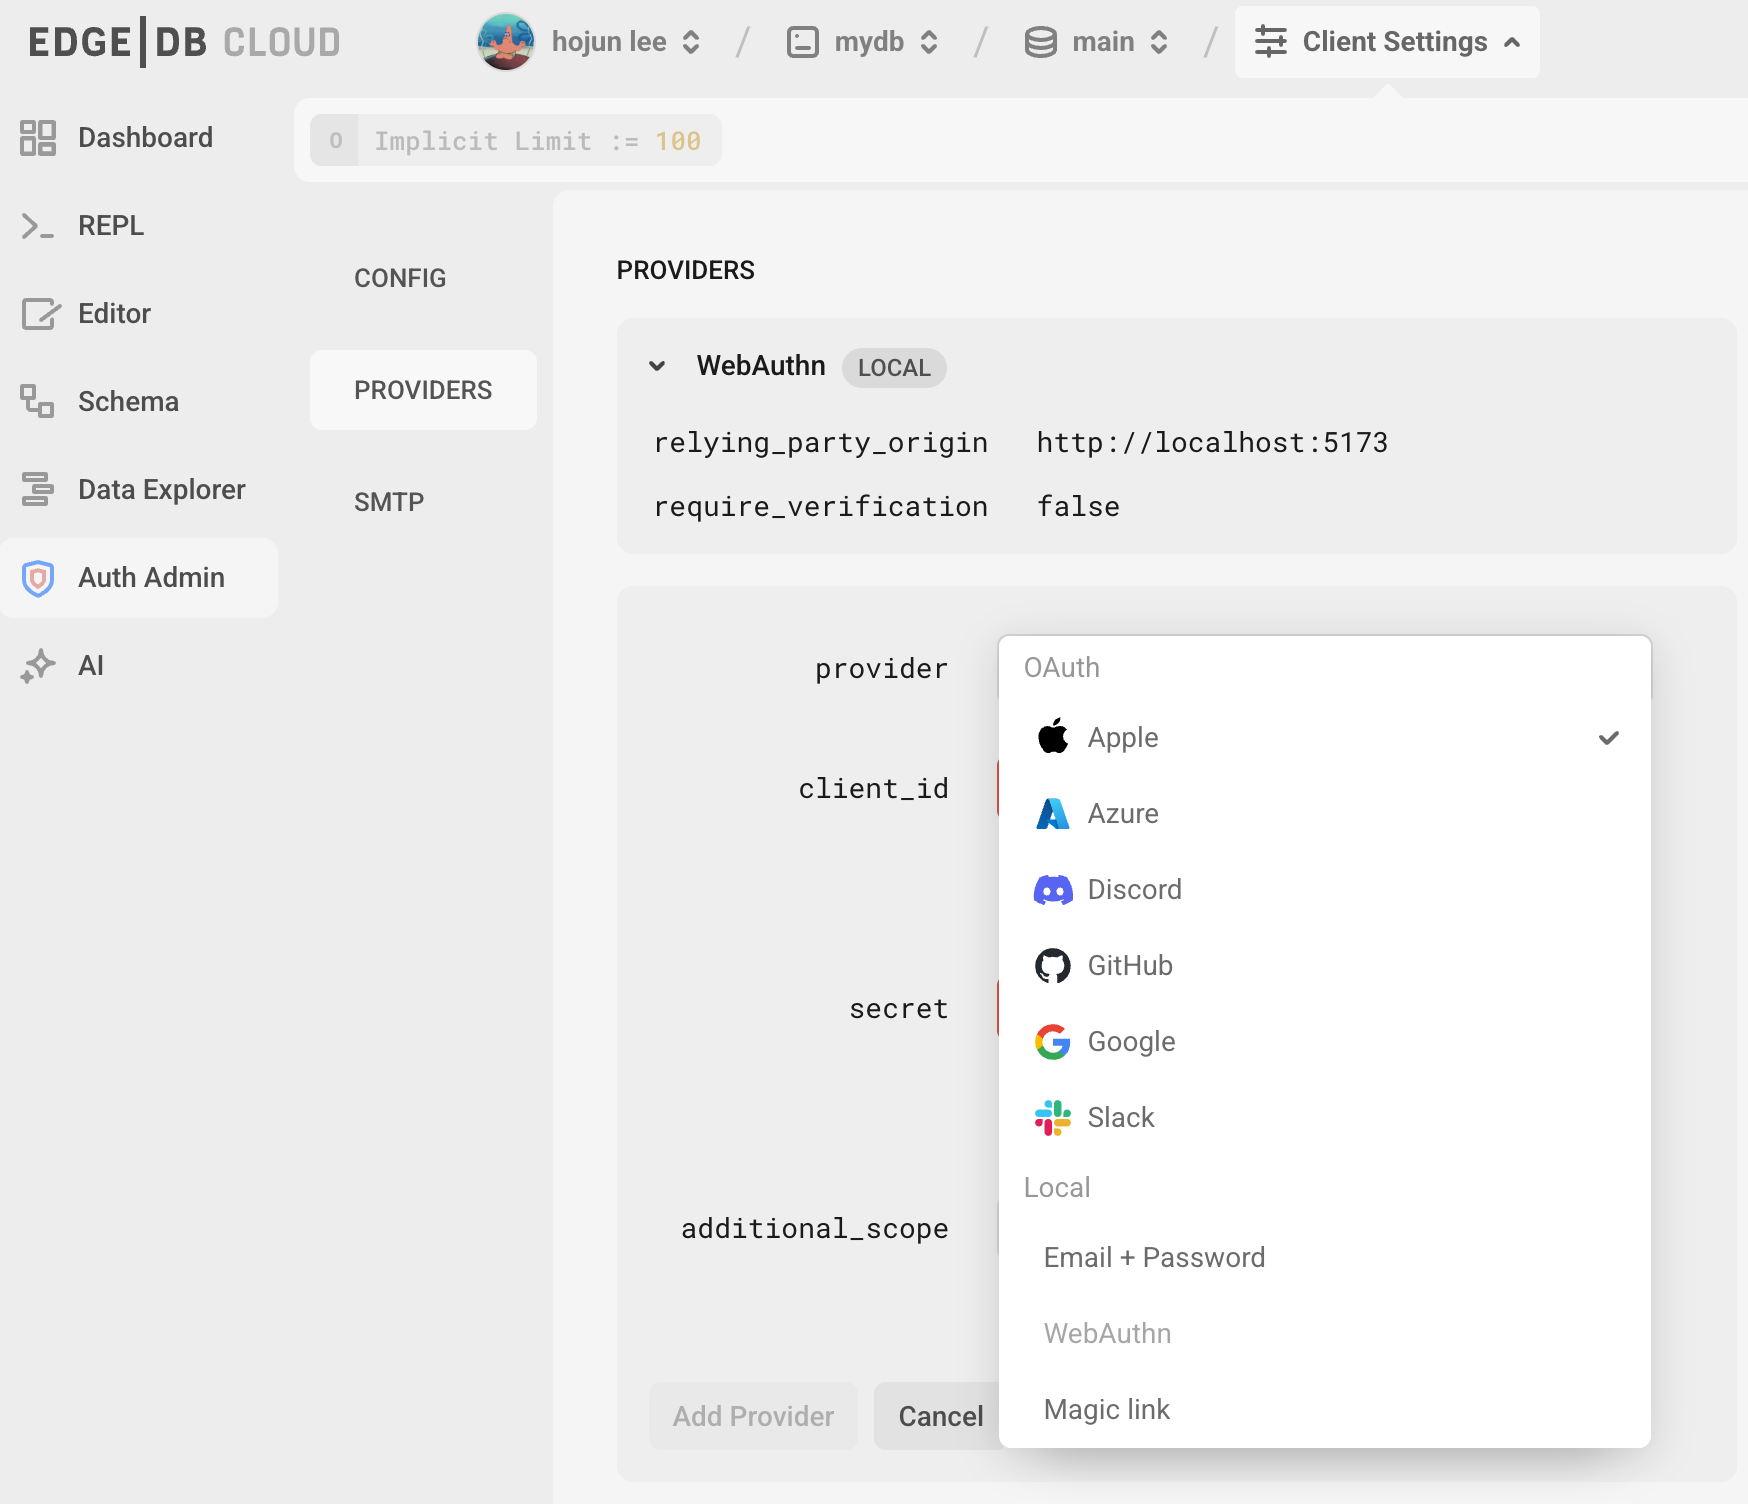
여기서 고민해야할 것이 있다. 당신은 verification을 true로 할 것 인지이다.
나는 아무생각없이 보안강화를 생각해서 true로 했다가 고생했다. 이메일이 안오는것도 모른채 webauthn의 로그인을 진행했다. response는 email_verification을 하라는 말 뿐이었다. 그래서 다시 읽고 false로 바꿔서 쉽게진행했다.
하지만 email_verification을 진행하는게 보안적으론 좋다.
note : require_verification defaults to true.
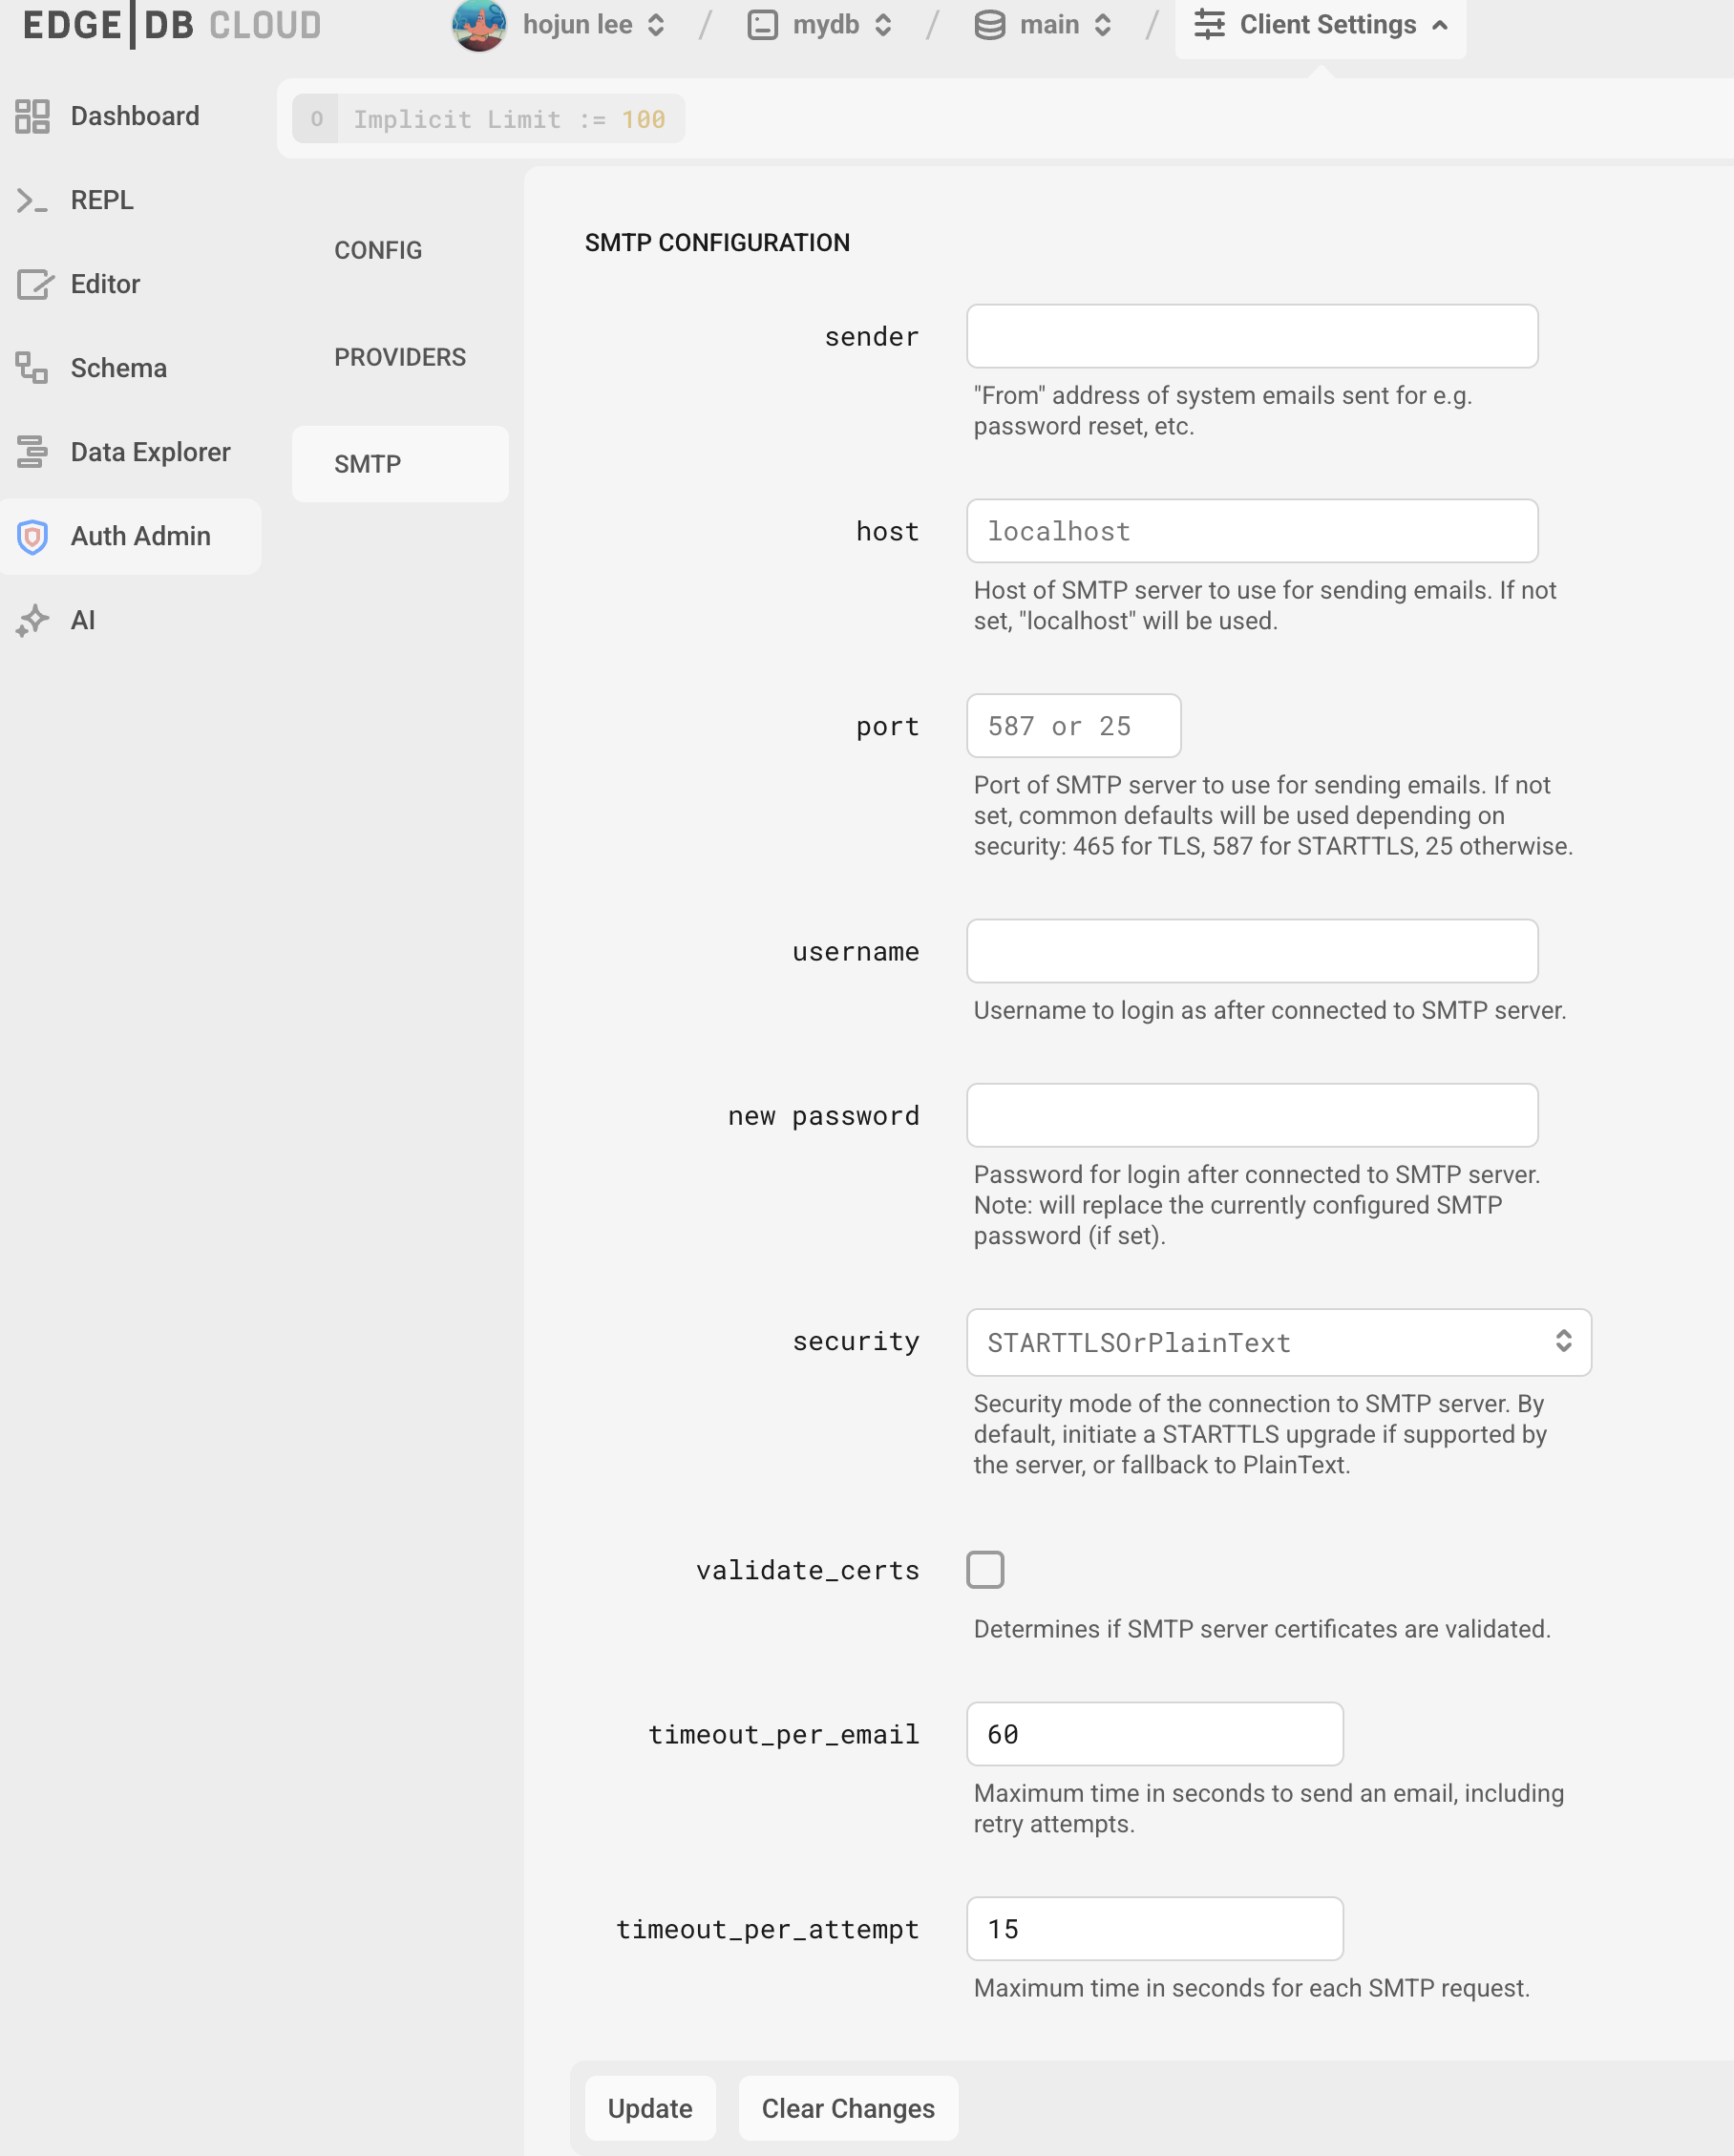
you'll need to configure SMTP to allow EdgeDB to send email verification and password reset emails on you behalf
SMTP를 등록해야한다. 이것도 edgeDB UI 에 있다.
이정도 설정을 마쳤으면 진짜 webauthn 을 코드로 적용해보자.
socket - webauthn code 적용
( 그냥 restAPI 연결하려면 edgeDB example 참고)
우린 sveltekit과 nodejs를 이용해 연결해볼 것이다. 앞서 말했듯 client와 server는 socket으로 연결해본다.
일단 일반적인 웹 어플리케이션을 시뮬레이션하는데 사용할 1개의 indexjs 파일에 nodejs http 서버를 구축하여 시연하겠다.
🫱🏻🫲🏽전제 1번 우리는 socket이 연결되어있다.
.env 참고
/**
 * You can get this value by running `edgedb instance credentials`.
 * Value should be:
 * `${protocol}://${host}:${port}/branch/${branch}/ext/auth/
 */
EDGEDB_AUTH_BASE_URL = ${host}:${port}/branch/${branch}/ext/auth/
실제 동작순서대로 진행해보겠다.
회원가입(registration Flow)
client -> signUp request
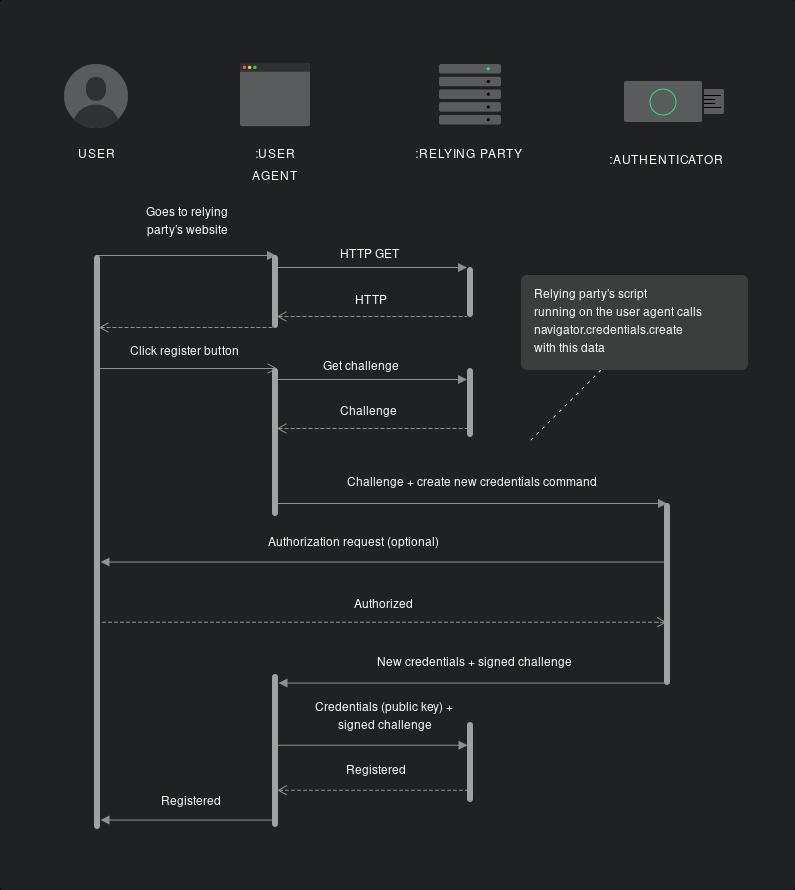
client : svelteKit
webauthn sign-up button click
    const signUp = async () => {
        if (!email) {
            errorMessage = 'No email provided'
            return
        }

        try {
            // 1. 옵션 요청 및 응답 처리
            const options = await new Promise((resolve, reject) => {
                const handleOptions = (options) => {
                    socket.off('webauthn:register:options:response', handleOptions)
                    if (dev) console.log('webauthn:register:options:response : socket off ')
                    resolve(options)
                }

                socket.on('webauthn:register:options:response', handleOptions)
                socket.emit('webauthn:register:options', { email })
            })
button을 클릭해서 on:click 이 발동하면 signUp 함수가 실행된다.
기존 열어둔 socket에서 on/emit 메서드를 실행한다.
기본으로 알아두는 소켓 메서드 socket.on('event name', callback) socket.emit('event name', data)
- on을 열어둔다.
- emit의 'webauthn:register:options' 이벤트명으로 email 변수를 전송한다.
- on의 'webauthn:register:options:response'이벤트명으로 응답이 오면 option이라는 변수에 resolve 한다.
- 사실상 의미없는 양방향 통신을 메모리 누수를 줄이기 위해 응답이오면 socket.off를 하는 callback을 실행한다.
📟 Server : nodejs
webauthn sign-up / 회원가입 옵션 응답
1. register options를 요청한다.
event : "webauthn:register:options"
email을 담아서 요청하면 관련정보를 생성하여 json data로 보내준다.
// 등록 옵션 요청
        socket.on("webauthn:register:options", async (data) => {
            console.log("📟 user로부터 register options 요청이 왔습니다.");
            try {
                const { email } = data;
                if (!email) {
                    socket.emit("webauthn:error", "Email is required");
                    return;
                }

                const registerUrl = new URL(
                    "webauthn/register/options",
                    EDGEDB_AUTH_BASE_URL
                );

                registerUrl.searchParams.set("email", email);

                const registerResponse = await fetch(registerUrl.href);

                if (!registerResponse.ok) {
                    const text = await registerResponse.text();
                    socket.emit(
                        "webauthn:error",
                        `Error from auth server: ${text}`
                    );
                    return;
                }

                const registerData = await registerResponse.json();
                socket.emit("webauthn:register:options:response", registerData);
            } catch (error) {
                console.error("Registration options error:", error);
                socket.emit("webauthn:error", "Internal server error");
            }
        });
- 이벤트 명을 확인하고 data에서 email을 디스트럭처링한다.
- degeDB에서 원하는 Url을 생성한다. env 값은 위 참고.
- searchParams에 email키에 email을 value에 담는다.
- 해당 url로 get으로 fetch 요청한다.
- 돌아온 데이터를 json parse 한다.
"webauthn:register:options:response"이벤트로 결과를 담아서 보내준다.- client에서는 on으로 받는다.
현재 register option이 생성 되었다.
client : svelteKit
2. credentials 생성
// signUp 함수에서 계속
import { createCredentials, encodeAssertion} from './signUp'

// 2. 크리덴셜 생성
const userHandle = options.user.id
const credentials = await createCredentials(options, userHandle)
const encodedCredentials = SetEncodeCredentials(credentials)
webauthn 크레덴셜 하는 모듈을 따로 js로 만들었다.
//signUp.js
// Base64URL to Uint8Array
function base64UrlToBytes(base64url) {
    const base64 = base64url.replace(/-/g, '+').replace(/_/g, '/')
    const padLen = (4 - (base64.length % 4)) % 4
    const padded = base64 + '='.repeat(padLen)
    const binary = atob(padded)
    const bytes = new Uint8Array(binary.length)

    for (let i = 0; i < binary.length; i++) {
        bytes[i] = binary.charCodeAt(i)
    }
    return bytes
}

// Uint8Array to Base64URL
function bytesToBase64Url(bytes) {
    const binary = String.fromCharCode(...bytes)
    const base64 = btoa(binary)
    return base64.replace(/\+/g, '-').replace(/\//g, '_').replace(/=/g, '')
}

export function createCredentials(options, userHandle) {
    return navigator.credentials.create({
        publicKey: {
            ...options,
            challenge: base64UrlToBytes(options.challenge),
            user: {
                ...options.user,
                id: base64UrlToBytes(userHandle)
            },
            excludeCredentials: options.excludeCredentials?.map((cred) => ({
                ...cred,
                id: base64UrlToBytes(cred.id)
            }))
        }
    })
}

export function SetEncodeCredentials(credentials) {
    const { response } = credentials
    return {
        authenticatorAttachment: credentials.authenticatorAttachment,
        clientExtensionResults: credentials.getClientExtensionResults(),
        id: credentials.id,
        rawId: bytesToBase64Url(new Uint8Array(credentials.rawId)),
        response: {
            attestationObject: bytesToBase64Url(new Uint8Array(response.attestationObject)),
            clientDataJSON: bytesToBase64Url(new Uint8Array(response.clientDataJSON))
        },
        type: credentials.type
    }
}
3. emit webauthn register 등록요청
크레덴셜과 engcodeing된 credentilas를 만들었다면 다시 등록 요청을 해보자
// signUp 함수에서 계속

            // 3. 등록 요청 및 응답 처리
            const response = await new Promise((resolve, reject) => {
                const handleRegister = (response) => {
                    socket.off('webauthn:register:response', handleRegister)
                    if (dev) console.log('webauthn:register:response : socket off ')
                    resolve(response)
                }

                socket.on('webauthn:register:response', handleRegister)
                socket.emit('webauthn:register', {
                    email,
                    credentials: encodedCredentials,
                    provider: 'webauthn',
                    verify_url: 'http://localhost:3000/auth/webauthn/verify',
                    user_handle: userHandle
                })
            })
- 만들어진 data를 활용하여 emit한다. (fetch라면 post형태)
- 요창한대로 body를 채운다. 각종 변수들은 자기 상황에 맞게 바꿀 수 있다.
- on으로 응답을 기다린다.
- on에서 reponse가 왔으면 promise resolve 하여 response 변수에 담는다.
- socket.off를 하여 메모리 누수를 방지한다.
📟 Server : nodejs
2. register 암호화 및 최종 요청 등록
// 회원 등록 요청
        socket.on("webauthn:register", async (data) => {
            console.log("📟 user로부터 register 최종 요청이 왔습니다.");
            try {
                const { challenge, verifier } = generatePKCE();
                const registerUrl = new URL(
                    "webauthn/register",
                    EDGEDB_AUTH_BASE_URL
                );

                const response = await fetch(registerUrl.href, {
                    method: "POST",
                    headers: { "Content-Type": "application/json" },
                    body: JSON.stringify({ ...data, challenge }),
                });

                const result = await response.json();
                socket.emit("webauthn:register:response", {
                    verifier,
                    message: "회원가입 성공",
                });
            } catch (error) {
                socket.emit("webauthn:error", error.message);
            }
        });
webauthn PKCE flow
PKCE 흐름 시작 인증 토큰 및 기타 민감한 데이터는 PKCE(코드 교환 증명 키)를 사용하여 보호합니다.
애플리케이션 서버는 32바이트의 Base64 URL 인코딩 문자열(인코딩 후 43바이트가 됨)을 생성하며, 이를 검증자라고 합니다. 이 값을 플로우 기간 동안 저장해야 합니다. 이 상태를 유지하는 한 가지 방법은 브라우저가 서버에 이 값을 요청할 때 HttpOnly 쿠키를 사용하면 흐름이 끝날 때 쿠키 저장소에서 이 값을 검색하는 데 사용할 수 있습니다. 이 확인자 문자열을 가져와 SHA256으로 해시한 다음 base64url로 결과 문자열을 인코딩합니다. 이 새 문자열을 챌린지라고 합니다.
// PKCE.js 만들어서 import

import crypto from "node:crypto";

/**
 * Generate a random Base64 url-encoded string, and derive a "challenge"
 * string from that string to use as proof that the request for a token
 * later is made from the same user agent that made the original request
 *
 * @returns {Object} The verifier and challenge strings
 */
export const generatePKCE = () => {
    const verifier = crypto.randomBytes(32).toString("base64url");

    const challenge = crypto
        .createHash("sha256")
        .update(verifier)
        .digest("base64url");

    return { verifier, challenge };
};
- challenge, verifier를 생성한다.
- edgeDB에 URL을 만들어준다.
- 해당 URL로 fetch post를 한다. body를 담아서 보낸다.
- result를 받아서 회원가입 성공한다.
회원가입을 성공한다. email_verification : true 인 경우 이 사이 이메일이 간다.
로그인(Authentication Flow)
client -> signIn request
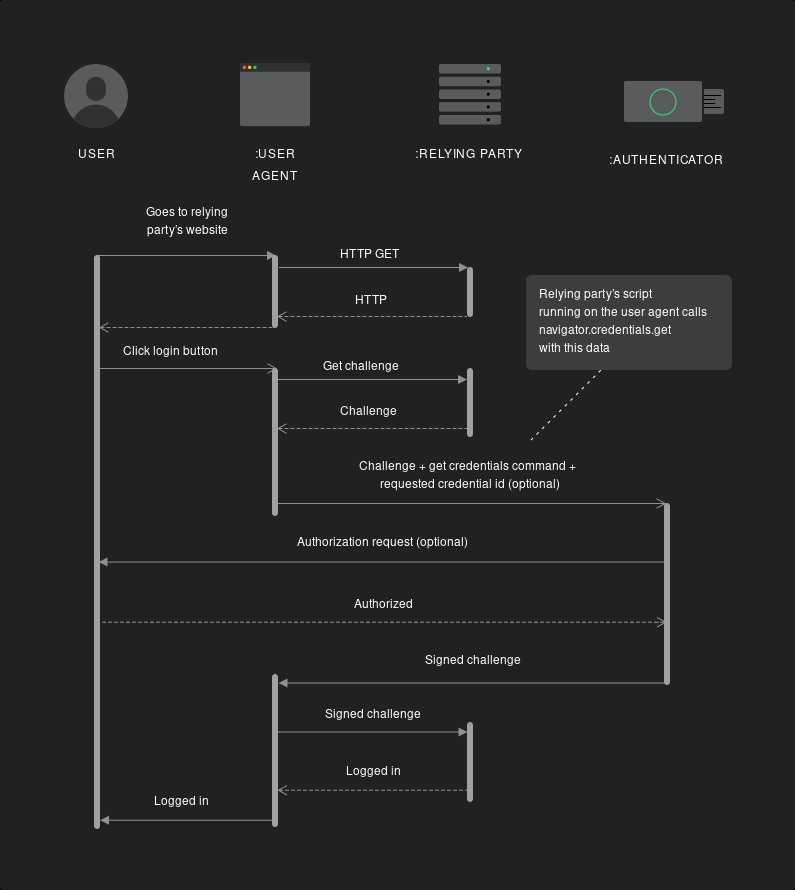
client : svelteKit
webauthn sign-in button click
    const signIn = async () => {
        if (!email) {
            errorMessage = 'No email provided'
            return
        }

        try {
            const options = await new Promise((resolve, reject) => {
                const handleOptions = (options) => {
                    socket.off('webauthn:authenticate:options:response', handleOptions)
                    if (dev) console.log('webauthn:authenticate:options:response : socket off ')
                    resolve(options)
                }

                socket.emit('webauthn:authenticate:options', { email })
                socket.on('webauthn:authenticate:options:response', handleOptions)
            })

getAssertion(options)- 회원가입과 프로세스는 거의 동일하다.
- options를 받는다.
📟 Server : nodejs
1. Authentication 옵션 요청/응답
import { createCredentials, encodeAssertion, getAssertion, SetEncodeCredentials } from './signUp'
        // 로그인 인증 옵션 요청
        socket.on("webauthn:authenticate:options", async (data) => {
            try {
                const { email } = data;
                const authUrl = new URL(
                    "webauthn/authenticate/options",
                    EDGEDB_AUTH_BASE_URL
                );
                authUrl.searchParams.set("email", email);

                const response = await fetch(authUrl.href);
                const result = await response.json();

                socket.emit("webauthn:authenticate:options:response", result);
            } catch (error) {
                socket.emit("webauthn:error", error.message);
            }
});- register와 동일하게 응답을 이벤트명과 맞게 돌려준다.
client : svelteKit
2. assertion 생성
options를 확인 하는 로직을 거친다.
            // 2. assertion 생성
            const assertion = await getAssertion(options)

            if (!assertion) {
                throw new Error('Failed to sign in')
            }
            const encodedAssertion = encodeAssertion(assertion)
// sign.js
// sign in fuction
export async function getAssertion(options) {
try {
const publicKeyCredential = await navigator.credentials.get({
publicKey: {
...options,
challenge: base64UrlToBytes(options.challenge),
allowCredentials: options.allowCredentials?.map((credential) => ({
...credential,
id: base64UrlToBytes(credential.id)
}))
}
})
if (!publicKeyCredential) {
throw new Error('인증 실패: 크리덴셜을 가져올 수 없습니다.')
}
return publicKeyCredential
} catch (error) {
console.error('Assertion error:', error)
throw new Error(`인증 실패: ${error.message}`)
}
}
export function encodeAssertion(assertion) {
const { response: assertionResponse } = assertion
return {
type: assertion.type,
id: assertion.id,
authenticatorAttachments: assertion.authenticatorAttachment,
clientExtensionResults: assertion.getClientExtensionResults(),
rawId: bytesToBase64Url(new Uint8Array(assertion.rawId)),
response: {
authenticatorData: bytesToBase64Url(new Uint8Array(assertionResponse.authenticatorData)),
clientDataJSON: bytesToBase64Url(new Uint8Array(assertionResponse.clientDataJSON)),
signature: bytesToBase64Url(new Uint8Array(assertionResponse.signature)),
userHandle: assertionResponse.userHandle
? bytesToBase64Url(new Uint8Array(assertionResponse.userHandle))
: null
}
}
}
3. 로그인 요청 및 응답처리
// 3. 로그인 요청 및 응답 처리
            const response = await new Promise((resolve) => {
                const handleAuthenticate = (response) => {
                    socket.off('webauthn:authenticate:response', handleAuthenticate)
                    if (dev) console.log('webauthn:authenticate:response : socket off ')
                    resolve(response)
                }

                socket.on('webauthn:authenticate:response', handleAuthenticate)
                socket.emit('webauthn:authenticate', {
                    email,
                    assertion: encodedAssertion,
                    verify_url: 'http://localhost:3000/auth/webauthn/verify',
                    provider: 'webauthn',
                })
})- 이벤트 값에 emit을 해주는데 규격에 맞게 body를 담아서 보낸다.
- 값이 돌아오면 response에 담아주고 socket은 메모리 누수 방지를 위해 닫아준다.
- 이를 이제 login session에 활용하면 되겠다.
📟 Server : nodejs
1. Authentication 옵션 요청/응답
// 로그인 요청
// 인증 처리
socket.on("webauthn:authenticate", async (data) => {
console.log("📟 user로부터 authenticate 로그인 요청이 왔습니다.");
try {
const { email, provider, assertion } = data;
// console.log("email :>> ", email, provider, assertion);
const { challenge, verifier } = generatePKCE();
if (!email || !provider || !assertion) {
socket.emit(
"webauthn:error",
"필수 데이터가 누락되었습니다."
);
return;
}
// 인증 요청
const authenticateUrl = new URL(
"webauthn/authenticate",
EDGEDB_AUTH_BASE_URL
);
const authenticateResponse = await fetch(authenticateUrl.href, {
method: "POST",
headers: { "Content-Type": "application/json" },
body: JSON.stringify({
provider,
email,
assertion,
challenge,
verifier: false,
}),
});
if (!authenticateResponse.ok) {
const text = await authenticateResponse.text();
socket.emit("webauthn:error", `인증 서버 오류: ${text}`);
return;
}
const authenticateData = await authenticateResponse.json();
console.log(
"🚀 ~ socket.on ~ authenticateData:",
authenticateData
);
// 토큰 요청 및 처리
if ("code" in authenticateData) {
const tokenUrl = new URL("token", EDGEDB_AUTH_BASE_URL);
tokenUrl.searchParams.set("code", authenticateData.code);
tokenUrl.searchParams.set("verifier", verifier);
const tokenResponse = await fetch(tokenUrl.href);
console.log(
"🚀 ~ socket.on ~ tokenResponse:",
tokenResponse
);
if (!tokenResponse.ok) {
const text = await tokenResponse.text();
console.log("🚀 ~ socket.on ~ text:", text);
socket.emit(
"webauthn:error",
`토큰 서버 오류: ${text}`
);
return;
}
const { auth_token } = await tokenResponse.json();
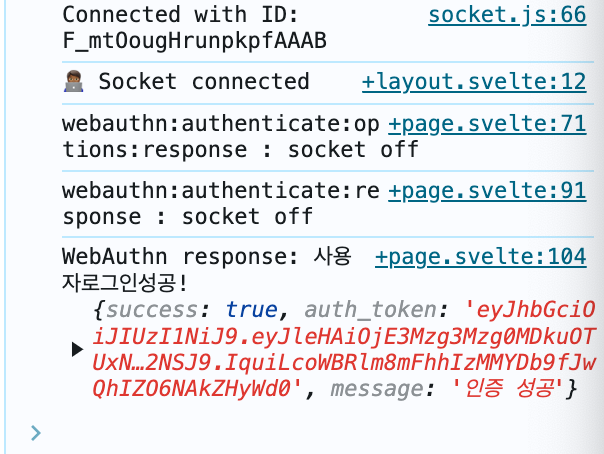
// 인증 성공 응답
socket.emit("webauthn:authenticate:response", {
success: true,
auth_token,
message: "인증 성공",
});
} else {
socket.emit("webauthn:error", "이메일 인증이 필요합니다.");
}
} catch (error) {
console.error("Authentication error:", error);
socket.emit("webauthn:error", error.message);
}
});
});로그인 인증 부분인데 여기서 애를 많이먹었다. POST로 보내는 과정은 동일한데, 예제는 verifier를 true인 상태였다. 나는 webauthn email인증을 안한 상태였는데, 계속 error 메세지로 인증하라고 왔다. 근데 계속 메일이 안왔다.
provider setting을 false로 바꾸고도 잘안되서 body값을 손봤다.
body값에 verifier: false 값을 추가해주니 error내용이 바뀌었다.
회원가입과 다르게 webauthn token 요청 및 처리하는 로직이 있다. 여기서 이메일인증을하면 자동으로 삽입되는것같은데, 우린 하지 않았으니 searchParams에 verifier 값을 추가해주었다.
tokenUrl.searchParams.set("verifier", verifier);
그리고 해당 URL로 get 요청을 한다.
그러면 auth_token값을 준다.
로그인 성공이다.
이 토큰 값을 야무지게 활용하면 로그인 기능으로 활용할 수 있다.
결론
socket으로 webauthn의 client와 server 통신을 진행해봤다. 사실 sdk나 만들어진 모듈을 사용하면 무지 쉬울 것 같다. 하지만 이렇게 통신해본 결과 w3c 웹표준의 로그인을 이해할 수 있었고, socket과 조금은 친해진 기분이다. 공부하듯 차근차근 보면 안될 일은 없는데 참 어렵다 ^_^; 그래도 socket과 webautn 그리고 edgeDB를 이해하는데 큰 도움이 되었다.

_1736326849644.jpeg)